SSH Deploy Keys Walkthrough
If the instructions in Authentication: SSH Deploy Keys did not work for you (for example, ssh-keygen is not installed), don't worry! This walkthrough will guide you through the process. There are three main steps:
- Generating an SSH Key
- Adding the Public Key to GitHub or Gitea such as Codeberg
- Adding the Private Key
Generating an SSH Key
The first step is to generate an SSH key. An SSH key is made up of two components: a public key, which can be shared publicly, and a private key, which you should ensure is never shared publicly.
The public key usually looks something like this
ssh-rsa [base64-encoded-key] [optional-comment]And the private key usually look something like this
-----BEGIN RSA PRIVATE KEY-----
 ... base64-encoded key over several lines ...
-----END RSA PRIVATE KEY-----
If you have ssh-keygen installed
If you have ssh-keygen installed, but DocumenterTools.genkeys() didn't work, you can generate an SSH key as follows. First, generate a key using ssh-keygen and save it to the file privatekey:
shell> ssh-keygen -N "" -f privatekeyNext, we need to encode the private key in Base64. Run the following command:
julia> using Base64

julia> read("privatekey", String) |> base64encode |>  println
Copy and paste the output somewhere. This is your private key and is required for the last step.
Now we need to get the public key. Run the following command:
julia> read("privatekey.pub", String) |> printlnCopy and paste the output somewhere. This is your public key and is required for the step Adding the Public Key to GitHub or Gitea such as Codeberg.
If you do not have ssh-keygen
If you're using Windows, you probably don't have ssh-keygen installed. Instead, we're going to use a program called PuTTY. The first step in the process to generate a new SSH key is to download PuTTY:
- Download and install PuTTY
PuTTY is actually a collection of a few different programs. We need to use PuTTYgen. Open it, and you should get a window that looks like:
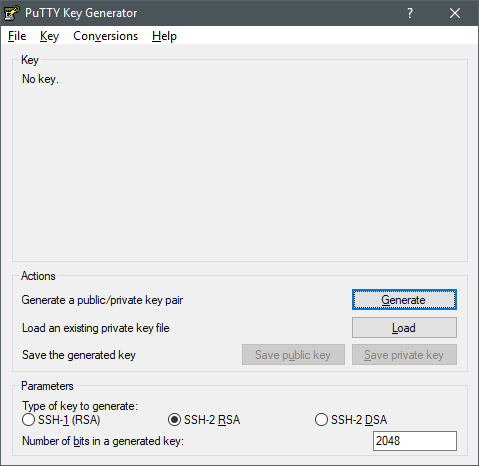
Now we need to generate a key.
- Click the "Generate" button, then follow the instructions and move the mouse around to create randomness.
Once you've moved the mouse enough, the window should look like:

Now we need to save the public key somewhere.
- Copy the text in the box titled "Public key for pasting into OpenSSH authorized_keys file" and paste it somewhere for later. This is your public key and is required for the step Adding the Public Key to GitHub or Gitea such as Codeberg
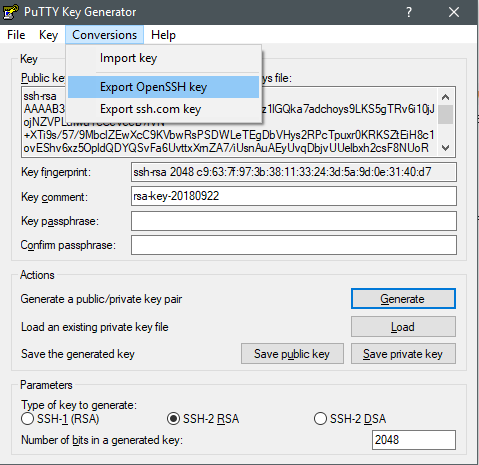
Finally, we need to save the private key somewhere.
Click the "Conversions" tab, and then click "Export OpenSSH key". Save that file somewhere. That file is your private key and is required for the last step.
If you made it this far, congratulations! You now have the private and public keys needed to set up automatic deployment of your documentation. The next steps are to add the keys to GitHub and Travis.
Adding the Public Key to GitHub or Gitea such as Codeberg
In this section, we explain how to upload a public SSH key to GitHub and Gitea such as Codeberg. By this point , you should have generated a public key and saved it to a file. If you haven't done this, go read Generating an SSH Key.
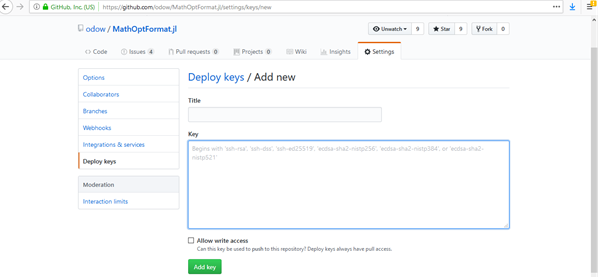
Go to https://github.com/[YOUR_USER_NAME]/[YOUR_REPO_NAME]/settings/keys for GitHub and https://somegiteaname.org/[YOUR_USER_NAME]/[YOUR_REPO_NAME]/settings/keys and click "Add deploy key". You should get to a page that looks like,:
GitHub
Gitea
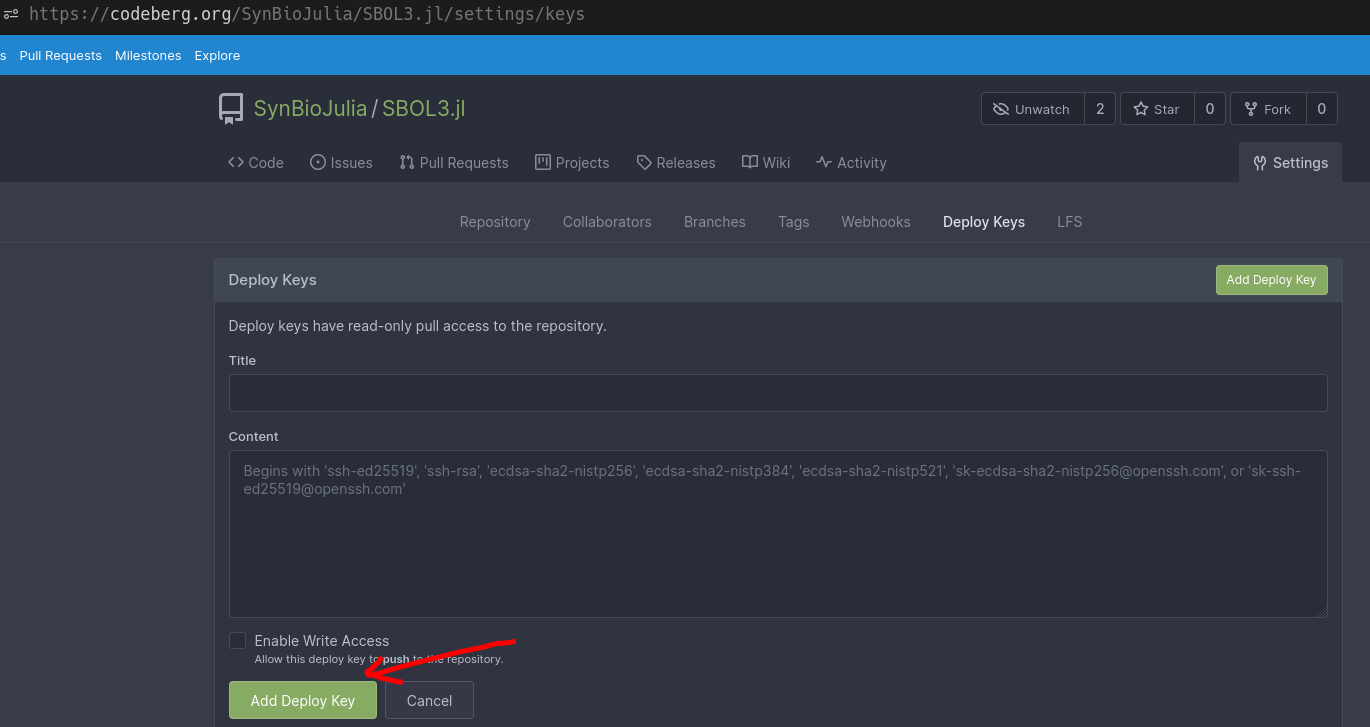
Now we need to fill in three pieces of information.
- Have "Title" be e.g. "Documenter".
- Copy and paste the public key that we generated in the Generating an SSH Key step into the "Key" or "Content" field.
- Make sure that the "Allow write access" box is checked.
Once you're done, click "Add key". Congratulations! You've added the public key to GitHub or your Gitea instance. The next step is to add the private key to Travis, GitHub, or Woodpecker Secrets.
Adding the Private Key
In this section, we explain how to upload a private SSH key to Travis. By this point, you should have generated a private key and saved it to a file. If you haven't done this, go read Generating an SSH Key.
First, we need to Base64 encode the private key. Open Julia, and run the command
julia> using Base64

julia> read("path/to/private/key", String) |> base64encode |> println
If you are in a unix and unix-like system, you can just use openssl command with tr (for truncate) to generate your base64-encoded-key.
$ openssl enc -base64 -in path/to/your/private/key -out path/to/your/base/64/encoded/key
$ # We need to truncate the newlines
$ cat path/to/your/base/64/encoded/key | tr -d "\n"
Copy the resulting output.
Go to https://travis-ci.com/[YOUR_USER_NAME]/[YOUR_REPO_NAME]/settings. Scroll down to the "Environment Variables" section. It should look like this:
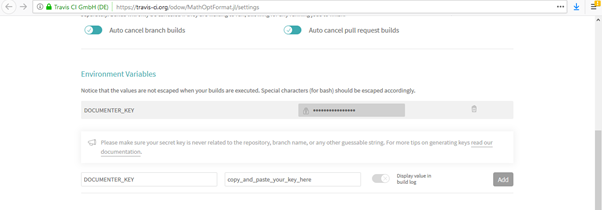
Now, add a new environment variable called DOCUMENTER_KEY, and set its value to the output from the Julia command above (make sure to remove the surrounding quotes).
Finally, make sure that the "Display value in build log" is left switched off and then click "Add". Congratulations! You've added the private key to Travis.
To reiterate: make sure that the "Display value in build log" option is OFF for the variable, so that it does not get printed when the tests run. This base64-encoded string contains the unencrypted private key that gives full write access to your repository, so it must be kept safe. Also, make sure that you never expose this variable in your tests, nor merge any code that does. You can read more about Travis environment variables in Travis User Documentation.
Final Remarks
You should now be able to continue on with the Hosting Documentation.